Tuesday, March 26, 2013

Creating Color Washes


Customers often pick this photo out of Annie Sloan's book Quick & Easy and ask how this look was created. I tell them that you can create a similar effect with a Color Wash.

What, you ask is a Color Wash? Basically, it can be accomplished by layering Chalk Paint® colors, using a thinned paint, to reveal either the wood or base color paint underneath. There are two types of Color Washes that I like to use for painting with Chalk Paint®.


First Method - The Limed Effect


Old White Wash - Duck Egg Base
    
This method is used for "white washing" an unfinished or natural wood piece of wood furniture. It will bring out the wood grain in a piece while adding a subtle amount of color. If you hate the idea of loosing the wood grain, then this method is for you.  

Step 1: Thin the paint by adding water - I use about 1/3 to 1/2 water. Don't make a huge batch since it will go a long way. I use distilled water to be sure that there is nothing in the water that will change the color of the paint, but you can use tap water.

Step 2: Apply the wash using a brush (a flat brush this time works well) being sure to cover all of the wood.

Step 3: Using a soft cloth gently work the wash into the wood by wiping the surface. The more you wipe off, the more translucent the stain will look, giving it a limed washed effect. 

Step 4: Wax using Clear or Dark Soft Wax, depending on the effect. Buff gently when dry.

You have to work fairly quickly with this process so that the wash doesn't dry before you can wipe it off. As with waxing, it is best to do this in sections. If the wash does dry to much, simply dampen a cloth before wiping.


Paris Grey and Louis Blue Wash with Old White Wash

This wash looks best over lighter woods! Old White, Pure White and Duck Egg are great colors to try.

Second Method - Two Color Wash


Paris Grey top and sides with Provence Drawer Fronts and French Linen Wash

I personally love this look. It is a great way to use two colors on a piece to achieve a subtle toning of the paint. Pick any two colors - some suggest one light and one dark, but I have found almost amy two colors will work. You will be amazed at the color combinations that work. 


Duck Egg Wash with Coco Top

Step 1: Paint a first coat as you normally would in your base color. 

Step 2: Create a Color Wash of your second color by mixing with water as above and apply over the first base coat with a brush after the base coat has dried thoroughly.

Step 3: Using a soft cloth folded into squares, gently wipe some of the wash by wiping the surface, turning the cloth over as it gets the wash on it. Try to wipe more or less in a straight line, I think it looks more natural, but try wiping in circles for a more mottled look.

Step 4: Apply Soft Clear Wax alone or with Soft Dark Wax. You will get a very different look with the two waxes. Buff gently when dry.


Anntionette with Coco Color Wash - Clear & Dark Soft Wax

Here are some great Color Wash combos that I have used - but go ahead and create your own! And, try reversing the colors for a whole different effect.

Country Grey with Old White Wash
Olive Base with Provence Wash
Old White with Coco Wash
Cream with Old Violet Wash
Pure White or Old White over any Color 

For more information on this and other layering techniques, see this Layering Tutorial.

Duck Egg and Provence Base with Chateau Grey Wash

Happy Painting!

Rachel


Click to see more tips, tutorials and photos: Paintbrush and Pearls

Tuesday, March 19, 2013

Practice Makes Perfect


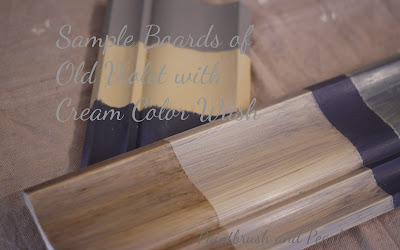
I was painting sample boards for my Chalk Paint® Class at the shop when I thought of how much I rely on sample boards to "guide" my painting. I almost always paint a board first, before I commit paint to furniture. It helps to guide my direction and to see what the outcome will be before I paint.
  

I first painted on sample boards during my "Train The Trainer" sessions when I first became a stockist for Chalk Paint® and have been doing this ever since, without giving much thought to it until now. But I rely quite a bit on these....


So, I am urging you all to take a few minutes before you start painting your masterpiece and paint sample boards!

I buy baseboard or crown moulding from the local hardware store (they even cut it for me). Don't buy plain wood - most furniture has detail which is why I choose moulding. 

I like to cut the boards to 12" to 18" to give me a good idea of the concept, using natural wood since I rarely distress down to the wood. If you usually paint already painted furniture, you may want to purchase the white moulding (it may better mimic painted wood finishes) and, if you do a lot a distressing down to the wood finish, you might want to stain the wood first, but that seems like an awful lot of work to me!


I also usually paint half with Annie Sloan Soft Clear Wax and half with Soft Dark Wax to see the effect. (Frog tape comes in handy to separate them.) 


Every once in a while I purge the old boards - they also serve to remind me of projects past and how my techniques have changed. So, I always put the paint color and technique on the backs (well, almost always!).


Happy Painting!

Rachel


P.S. - Wednesday, 3/20: Chalk Paint® Class in Richmond - Using Color - this class is full! but we will be holding more
Thursday, 3/1: Chalk Paint® Workshop in Irvington - still room in this 2-hour workshop

Click to see more tips, tutorials and photos: Paintbrush and Pearls
Click to see my Brocante Home Blog

Shop Hours: Irvington - Wed thru Sat from 10 to 4: Richmond - Tuesday thru Sat from 10 to 6.

Wednesday, March 13, 2013

Benefits of Using Annie Sloan Soft Wax


You have finished painting your piece - now what? 

You don't need to strip, sand or prime but, you do need to finish your piece with Annie Sloan Soft Wax. Why use this and not some other? 

  • Well, it is a soft wax as the name implies, which means that it will glide onto your furniture easily. 
  • It was made specifically made for her paint so it will be absorbed into the paint.
  • It will help to protect your project and is water resistant.
  • The Clear Wax has no color and will not yellow over time. 
  • This wax comes in both Clear and Dark, but you can mix it with Chalk Paint® to create a colored wax.
  • The wax has very little solvent which means it dries naturally and there is almost no odor.
  • It buffs to a beautiful patina. 

Remember to always wax first with the Clear Wax before applying the Dark Wax, which allows you to apply the Dark Wax where you want. If you don't, the Dark Wax will be absorbed directly into the paint and your piece will be too dark.


When would you not wax? It is not recommended on outdoor furniture and I personally do not wax inside drawers or cabinets. Otherwise, I wax most all of my projects. 

Join us at our next Chalk Paint® Workshop to learn more about waxing, sanding and buffing.


Tuesday, March 12, 2013

Featured Artist and Coco

So, you already know that I love Coco! Especially with Annie's Dark Wax, either direct or as a glaze as I sometimes do.


I think this dresser, by Chalk Paint® Stockist Kristen of Sophia's is just about perfect! I love how she accented the dresser in Old White as well as painted the handles. I often paint the handles on older pieces too. But, instead of painting the entire piece and using Dark Wax....


the top of the dresser was stripped and then stained in Walnut...


 and the entire piece was glazed in a white glaze - simply add Old White to the Clear Wax. It adds a nice sheen, don't you think?


Happy Painting!

Rachel


Click to see more tips, tutorials and photos: Paintbrush and Pearls
Click to see my Brocante Home Blog

Shop Hours: Irvington - Wed thru Sat from 10 to 4: Richmond - Tuesday thru Sat from 10 to 6.

Thursday, March 7, 2013

Meet Versailles!

I had a customer in the shop this week who, with his wife, had just painted their entire kitchen with......Versailles!


So, I'd like to introduce you to one of my favorite Chalk Paint® colors, Versailles. It's a little bit of green and a little bit of gray and a lot of perfection!


Like all of Annie's colors, various tints of Versailles can be made by mixing with Old White (for a vintage color) or Pure White (for a more "clean" color). Here are examples of furniture painted by fellow Stockist in Versailles.


Versailles is a soft, delicate, lightly yellow dusky green that is sophisticated and gentle yet it works well with modern pieces too. This is a color which picks up other colors well and changes character accordingly.

I'll be taking you on "tour" with other Chalk Paint colors in future blogs!

P.S. -  If painting high use areas like a kitchen, remember to seal with several coats of wax, allowing the paint and wax to cure.


Happy Painting!

Rachel


Click to see more tips, tutorials and photos: Paintbrush and Pearls
Click to see my Brocante Home Blog

Shop Hours: Irvington - Wed thru Sat from 10 to 4: Richmond - Tuesday thru Sat from 10 to 6.